Angel Food Cake With Blackberry Coulis
 |
Down to the last morsels of deliciousness! I knew I'd better get my last piece with the last of the blackberry coulis or all would be gone! I did forgo with a fork in order to stick each loving morsel of cake into the bowl and scoop up some beautiful fresh blackberry goodness, which I gladly licked off of my fingers. This is such a beautiful cake, it rises very high and is perfect plain or topped with fresh blackberry coulis, and of course everything else, like chocolate!
|
Aaaahhh! I sigh with complete satiation. One of my favorite things in the whole world is Angel Food Cake. Really good Angle Food Cake. As in made fresh not the gluey, cloyingly sweet, stuck in the disposable pan from the grocery store, cake. Nasty! If you're going to have it, have it good! Make it! I just can't say that enough which means you'll hear it here on my site many, many more times. ; )
❧
oulis: pronounced 'koōlē, (no S) it's a noun/plural noun that describes a thin fruit or vegetable puree, used as a sauce. Origins are French for couler, meaning "to flow".
❧
My post for the cake today will have many more photos than usual so I could document every step necessary for you to produce the best cake ever. It will be okay if your cake is a bit higher on one side, or has a bubble somewhere in the body. You will have made it, from scratch, all by yourself. And, you will be able to display, photograph, serve and eat it with confidence and pride! You can choose to serve it with just about any kind of topping from lightly sweetened fruit and whipped cream, your favorite ice cream or sorbet, or a fresh fruit coulis as presented here, you can substitute any type of fruit that you like. Or just cut a piece, hold it in your hand and gobble it down, especially before someone comes along and wants a bite!
I do have to interject here that my husband Greg passed on having a piece when I first cut it. He said that angel food cake really wasn't something he like very much. I said okay and cut two pieces, one for me and one for Christopher, which we were only to happy to eat absolutely plain. About 30 minutes later I can hear my husband take the bread knife from the knife rack, good ears hears the little "ping" when one is removed. He was trying so very hard to be quiet! He cut a bit of a piece, ate it, and deemed it passable, so he had a bigger piece. At least half of the cake has been consumed by him!
Okay, enough ranting, YOU CAN DO IT! Come along now, I'd be delighted to show you how.
Gluten Free Angel Food Cake With Fresh Blackberry Coulis
Before-hand hints and techniques:
**I really do not reccommend that you use the cartons of "egg whites" versus separating 12 eggs. Some of those products have additives, preservatives, and have been sitting on the shelf - and I don't care that there's an expiration date, fresh is always best!
Superfine sugar: you can buy it or make your own. The difference is definitely there in comparison to just using regular granulated sugar. Your cake will have a finer texture and crumb, and the process and time of whipping the whites will actually be easier and shorter in duration.
To make your own: simply whiz the amount of sugar called for in a clean coffee grinder or food processor. Yes, you can buy it in most stores, but it can be a bit pricey.
Egg whites: It is imperative that your mixing bowl for the egg whites is scrupulously clean! One tiny molecule of fat from the yolks or residual oil or butter will prevent your whites from whipping correctly or perhaps even at all. So when you are separating the whites from the yolks, use three containers, preferably glass, porcelain, or stainless steel. Plastic isn't recommended because it can hold fat residue.
To separate the eggs: Cold eggs are easiest to separate, but room temperature eggs are the best for whipping glossy and high. You will need three bowls, the mixer one that you will whip the whites in and one each for the separation of the yolks and whites to begin with. Holding one egg in your preferred hand, gently rap the egg on the flat countertop, not on the edge of your bowl as this makes a lot of tiny shards that might get into the glossy, gorgeous whipped whites.
I like to use Jacques Pépin's method: - simply drop the whole egg into one of the designated bowls, then gently scoop your hand under the yolk keeping your fingers almost closed, let the white slip back into the bowl and deposit the yolk into it's own bowl. You might need to gently squeeze your fingers together to "pinch" off the whites that continue to hold on to the yolk. Pour each single white into the large mixer bowl. Do this step one egg at a time! If you get even a hint of yolk into the whites you'll need to start completely over, first wiping the bowl clean.
If you do need to start over freeze the egg products you can't use right away, or make quiche for dinner!
Whipping the whites: Many recipes will tell you to whip the whites to stiff peaks. Don't. It makes the whites dry and your baked goods will be the same. If your finished whites look like whipped foam with tiny holes you've over beaten them. You can repair this only to a point by adding one more egg white and whipping just until all are glossy. I will be repeating this hint today along with photos.
Always use the whisk attachment for whatever type of mixer you have for beating egg whites, as this tool is designed specifically to incorporate air into whites, which is essential for producing a light and airy cake.
Sifting and whisking - You will need both a hand held whisk and either a sifter or a medium-fine sieve. It's essential to whisk Jeanne's AP Flour Blend that you've made ahead of time, to make sure all of the ingredients are well mixed and distributed prior to scooping into the dry ingredients bowl. I recommend that you place the sieve or sifter directly into the bowl, scoop your well mixed dry ingredients and then pour them into the sieve or sifter. Next sift all dry ingredients called for in the recipe, into the bowl. This creates some air into the dry ingredients, making them lighter, also checking for any lumps that need to be discarded. The end product for your trouble will be much easier to fold and incorporate into the gorgeous, glossy whites.
Assemble all of your ingredients ahead of time. It's much easier than stopping and re-starting in your recipe, which could cause problems for any recipe turnout.
Here we go! Ready? Sure you are! Let's do it!
Cake Ingredients: Makes about 10 servings
Jeanne's AP Flour Blend - make way ahead of time, and store in an airtight container:
1 1/2 cups brown rice flour
1 1/2 cups white rice flour
1 cup tapioca flour
1 cup sweet rice flour
2 teaspoon xantan gum
3/4 cup Jeanne's flour blend
1/4 cup cornstarch
1/2 cup superfine sugar
12 egg whites, room temperature and separated
1/4 teaspoon salt
1 1/2 teaspoons cream of tartare
2 teaspoons vanilla extract
1/2 teaspoon almond extract - optional
1/2 cup plus 2 Tablespoons superfine sugar
Coulis Ingredients:
12 oz. (two small baskets in the US) fresh blackberries
1 1/4 teaspoons fresh lemon juice - this adds a bright flavor to the coulis
2-4 teaspoons granulated sugar, (you will need to taste test and adjust it for your liking, we don't really like it too sweet as some tartness is really wonderful with the sweet cake.)
A couple of teaspoons of water
Extra things you'll need:
A 10" angel food cake pan with "feet", or a strong tall bottle to place the cake pan upside down on for cooling.

Angel food cakes must cool upside down to let the heat release while maintaining the cakes' volume and light texture. This type of cake, if cooled sitting on it's bottom will fall, and have a soggy bottom. It's worth your time and hard work to cool it correctly.
Directions:
Place the oven racks on the lowest position. Preheat the oven to 350°F.
DO NOT GREASE THE PAN!
DO NOT GREASE THE PAN!
1. Sift together in a large bowl the whisked 3/4 cup of Jeanne's AP Flour Blend, 1/4 cup of cornstarch, and the first 1/2 cup of sugar. Set aside.

2. In a large grease-free mixing bowl, beat the egg whites starting on low until whites are foamy,


gradually increasing the speed as the whites thicken. When whites are about half way up the bowl, add the cream of tartare and the salt, increase the speed to medium-high.
3. Next add the extract(s), and continue beating the whites which will increase in volume and become thicker.

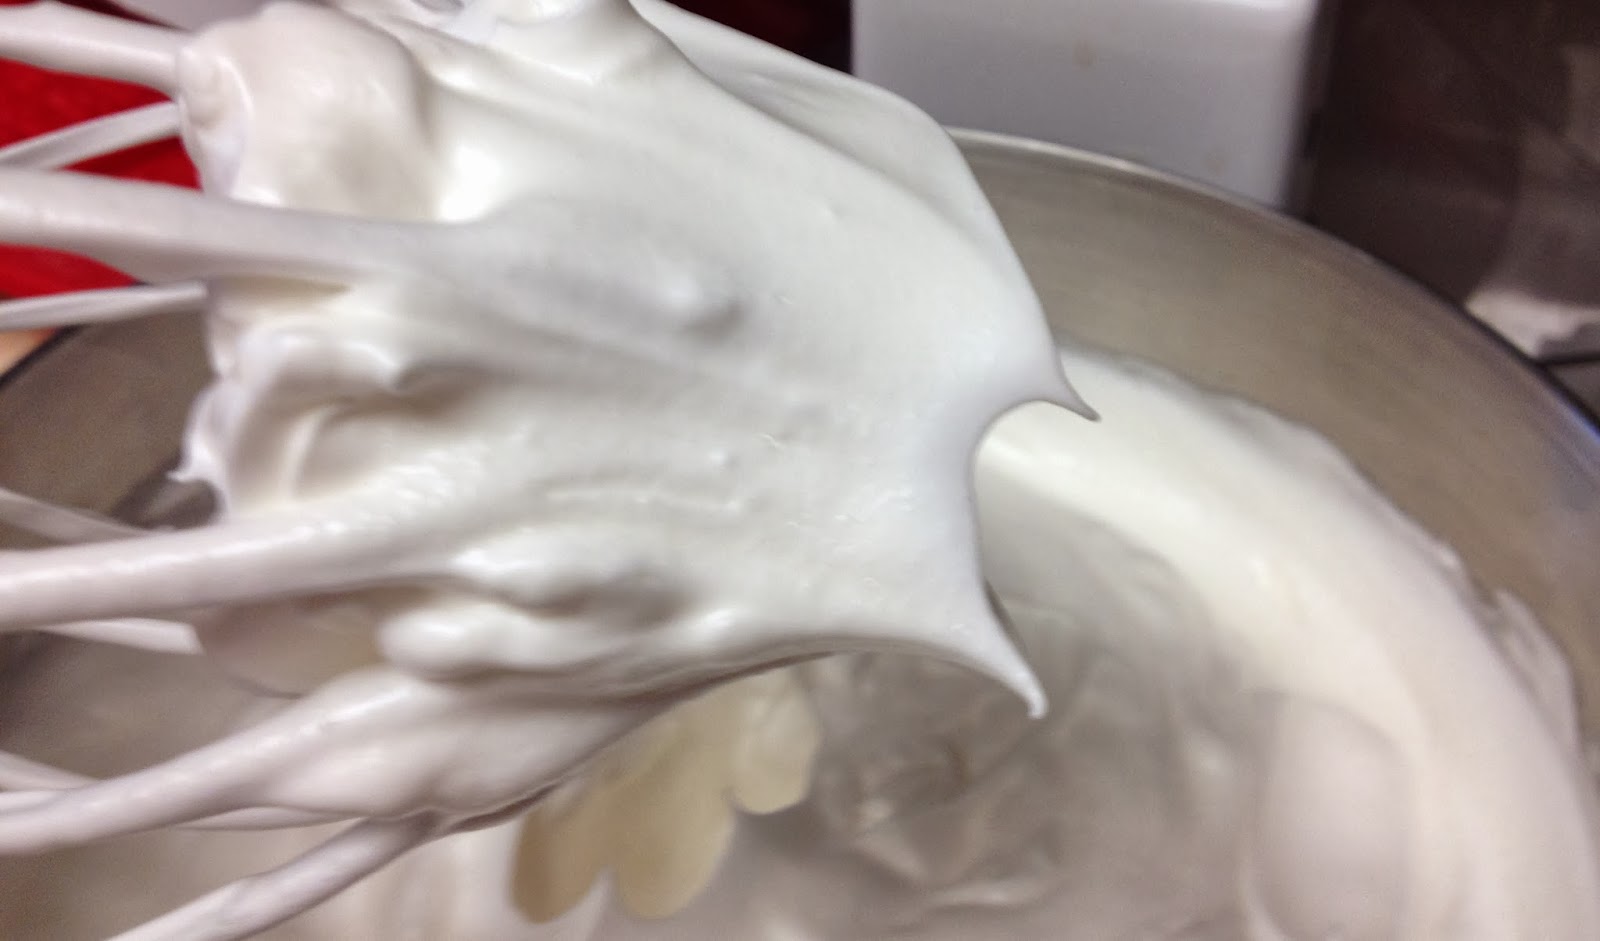
Add in the second 1/2 cup plus 2 Tablespoons of sugar, gradually one teaspoon at a time. You want your meringues to hold SOFT peaks, and they will look smooth and glossy.

 |
| Sorry this isn't the best picture, but I'm actually holding the beaten whites upside down so show you that when they are done correctly, they will cling to the bowl and not drop out! This is a scary tactic done in cooking schools. |
4. Transfer the whites to a very large bowl - this gives you ample room to fold in the dry ingredients, and keep the whites aerated.
 |
| This is my favorite bowl, it's huge and wide and gives me ample room to work in. |
 |
| Look at how beautiful and glossy these whites are! |

5. Gently fold in the dry ingredients about 1/4 cup at a time, by sprinkling the dry ingredients over the top of the whites. Then using a large rubber spatula, gently scoop under the whites, coming back up and over the whites, turn the bowl about a 1/4 turn every time you scoop under.

Occasionally, about every 3-4 swipes, gently swipe the spatula through the middle, continuing then to scoop under once again. You will only do this until all of the flour is JUST incorporated. Small amounts of flour seen here and there is perfectly fine. If you over fold/mix the volume will most likely fall.
6. Using a big spoon, place spoonfuls of the batter into the 10" UN-GREASED pan.

Then gently smooth the top with a small spatula or knife. GENTLY tap the whole cake, flat, onto the counter to remove any air bubbles.

7. Bake the cake until it's a golden brown, and the top springs back when pressed lightly. Bake about 35-40 minutes.


8. Remove the cake from the oven and imeadiately turn the pan over and stand on the attached legs onto a cooling rack.

If you don't have attached feet, place the pan's center core over a sturdy bottle. This will keep it elevated so it can properly cool. Cool for a minimum of two hours before serving. The cake will be very tender and cutting it too soon will tear it. You will have best results in cutting this type of cake by using either a bread knife or and old fashioned "fork" cutter.
 |
| I found this gorgeous fork for cutting all types of airy cakes in one of our local antique stores. It's beautiful and does a great job. It's also a great conversation piece during dessert. Nope, I don't loan it. Several have asked, but I just can't do it. Besides, that would prevent them from shopping and finding their own treasures!  |
1. Coulis:
In a medium saucepan, add the berries, lemon juice, and sugar, and gently simmer. Keep a watchful eye on this so it doesn't burn or scorch. I turn my flame down so low you can't hardly see it. Stir and mash with a spatula, or a bean smasher.

2. **Once the fruit is all softened and mashed apart, transfer all of it at once to a fine mesh sieve over a clean bowl. You will mash the fruit mixture through the sieve to separate the fruit from the seeds which will be discarded. Be sure to scrape around the outside bottom of the sieve basket, a lot of usable fruit will cling here, into the bowl.
In a medium saucepan, add the berries, lemon juice, and sugar, and gently simmer. Keep a watchful eye on this so it doesn't burn or scorch. I turn my flame down so low you can't hardly see it. Stir and mash with a spatula, or a bean smasher.
 |
| This little bean smasher is a great tool for lots of foods besides beans. You can find it in Mexican markets, and most likely online. They are very inexpensive and indispensable once you've got it. |
 |
| Since I was making a very small amount I could use very small tools. You can use whatever size makes you happy. |
3. Once that is accomplished, wipe any seeds left in the saucepan out, then add the fruit mixture back into the saucepan. Again with the flame on the lowest possible, add one teaspoon of water to the mixture. Simmer to thicken the sauce. You add as many teaspoons of water as you like to increase the volume, but the goal is to thicken the sauce, while heightening the taste. Each cake slice should get a couple of spoonfuls. Let the sauce cool at room temperature to serve.
**This step can also be done with a food mill, then transfer to the fine mesh sieve and follow the rest of steps 2 through 3.

Great! You did it! I hope you send me a photo of your beautiful cake, I'd love to see them.
Enjoy!

No comments:
Post a Comment